In a comment on one of my posts on the AMIS technology blog I had a question on UIComponents. The question was if it is possible to modify prompts and labels of components programmatically. As a matter of fact this is possible. You can do this for the session only, or you can choose to persist these changes. In this post I first explain how to implement the "session only" functionality, and in the second part I explain how to use a persisted resource bundle with immediate refresh.
Application Setup
The application used in this post is based on the HR schema and the business components are created and not changed.
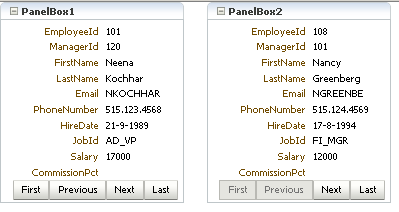
First of all you create a page that is used to hold components of which you want to change labels and prompts. Create two panelboxes next to each other. In the first one drop the employees collection and in the second one drop the child employees collection. Drop both as read only form. When browsing the first box, the second one will show the subordinate employees (if any).
Making the Prompts Adjustable
In order to have full control on the attributes of the panelboxes, you have to bind the panelboxes to a bean.
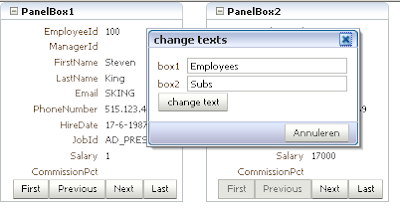
In the componentEditor bean, you now have full control over the properties of the panelboxes. You need a way to enter the new values for the prompts of the panelboxes. We will use a popup for that. Add a popup behavior to both of the panelboxes.
Define the popup in the page. In this popup we will also use a button to submit the changes to the server.
The next step is to add input components to the popup that you can use to enter the new values for the components' label. For this example we will add two; one for each panelbox.
Note that these two input components are bound to the same bean as all other components. If you invoke the popup you can now enter alternative values for the panelbox' headers.
The code in the backing bean that is invoked when the button is pressed, is responsible for actually changing of the prompts. This code is not very difficult.
When the button is pressed the changes are visible immediately.

Persisting Changes
So far, the changes are only visible during the session. If you need to persist the changes you would need a table to store the values, some ADF-BC objects to do the ORM for you, and some logic in the bean to invoke the save action. Besides that, we will use a class based resource bundle.
First let's create the table. For now keep it simple, but be aware that in real life you could also add languages, userid, pageid's (ID's are unique per page).
Creating Business Components
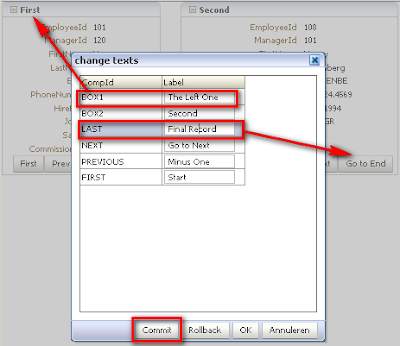
Add the business components that will be responsible for persisting the changes, by simply creating them via the wizard. While in the wizard, make sure to add the viewobject to the application module as well, as it will be used in the page.

Now select the "CutstomLabelsView" collection from the datacontrol and drop it as a table on the popup.
Creating the Resource Bundle
Create a new class called demoResources that extends ListResourceBundle class.
In this class create a method getContents() to collect data from the database via the binding framework, and add the fetched data to the resource bundle.
Preparing the Page
In the page, we have to make sure that the resource bundle is recognized and used.
This can be achieved by using, as is shown in the code fragment below.
For all labels that need to be dynamic, create a reference to the resource bundle. In this example we will just use a few. These, and all others, all look like the following example.
You can pick as many components as you like, just as long as the resource keys that you reference are also available in the database table. You might want to consider adding functionality to the application to add resource keys to the table.
The Magic Part
In order to refresh the bundle every time changes are committed to the database, we just add an extra method to the demoResources class. This method, called refreshBundle gets the bundleName as argument, and when invoked, it will force the bundle to refresh. This can be done by invoking the clearCache method on this bundle.
Now we only need to make sure that necessary code is executed when committing changes to the database. First add an action attribute to the commit button. This action has to invoke a method ( saveAndRefresh() ) in the componentEditor bean.
In the saveAndRefresh method, invoke the refreshBundle() method.
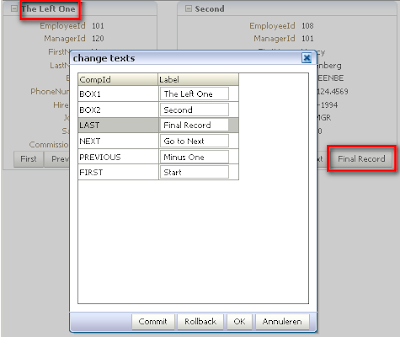
And now, when running the application, every time changes are made to the custom Labels table, the bundle is refreshed, and the new labels are displayed immediately.
And see how this results in an immediate and persisted change.
Conclusion
The use case in this post is just an example of how to persist resource bundle changes and immediatley see these changes in the application. However, by extending ListResourceBundle class, as I did, you can also add objects to the resource bundle. This could for instance be used to implement some kind of content management functionality that will reflect changes immediately.
The application used in this blog is available here.
Application Setup
The application used in this post is based on the HR schema and the business components are created and not changed.
First of all you create a page that is used to hold components of which you want to change labels and prompts. Create two panelboxes next to each other. In the first one drop the employees collection and in the second one drop the child employees collection. Drop both as read only form. When browsing the first box, the second one will show the subordinate employees (if any).

Making the Prompts Adjustable
In order to have full control on the attributes of the panelboxes, you have to bind the panelboxes to a bean.
1:  <af:panelBox text="PanelBox1" id="pb1"
2:              binding="#{componentEditor.firstPanelBox}">
3:  ...........
4:  <af:panelBox text="PanelBox2" id="pb2"
5:              binding="#{componentEditor.secondPanelBox}">
6:  ...........
In the componentEditor bean, you now have full control over the properties of the panelboxes. You need a way to enter the new values for the prompts of the panelboxes. We will use a popup for that. Add a popup behavior to both of the panelboxes.
1:        <af:showPopupBehavior popupId="labelEditor"
2:                   triggerType="click"/>
Define the popup in the page. In this popup we will also use a button to submit the changes to the server.
1:      <af:popup id="labelEditor">
2:       <af:dialog okVisible="false" title="change texts">
3:        <af:panelGroupLayout layout="vertical">
4:         <af:commandButton text="change text"
5:                  actionListener="#{componentEditor.editLabel}"/>
6:        </af:panelGroupLayout>
7:       </af:dialog>
8:      </af:popup>
The next step is to add input components to the popup that you can use to enter the new values for the components' label. For this example we will add two; one for each panelbox.
1:         <af:inputText label="box 1"
2:                binding="#{componentEditor.boxOneLabelValue}"
3:                value="test">
4:         </af:inputText>
5:         <af:inputText label="box 2"
6:                binding="#{componentEditor.boxTwoLabelValue}"
7:                value="test">
8:         </af:inputText>
Note that these two input components are bound to the same bean as all other components. If you invoke the popup you can now enter alternative values for the panelbox' headers.

The code in the backing bean that is invoked when the button is pressed, is responsible for actually changing of the prompts. This code is not very difficult.
1:   public void editLabel(ActionEvent actionEvent) {
2:    // Add event code here...
3:    firstPanelBox.setText((String)getBoxOneLabelValue().getValue());
4:    secondPanelBox.setText((String)getBoxTwoLabelValue().getValue());
5:    AdfFacesContext.getCurrentInstance().addPartialTarget(this.getFirstPanelBox());
6:    AdfFacesContext.getCurrentInstance().addPartialTarget(this.getSecondPanelBox());
7:   }
When the button is pressed the changes are visible immediately.

Persisting Changes
So far, the changes are only visible during the session. If you need to persist the changes you would need a table to store the values, some ADF-BC objects to do the ORM for you, and some logic in the bean to invoke the save action. Besides that, we will use a class based resource bundle.
First let's create the table. For now keep it simple, but be aware that in real life you could also add languages, userid, pageid's (ID's are unique per page).
1:   CREATE TABLE CUTSTOM_LABELS
2:    (
3:      COMP_ID VARCHAR2(32 BYTE) NOT NULL ENABLE,
4:       LABEL VARCHAR2(64 BYTE) NOT NULL ENABLE
5:    )
Creating Business Components
Add the business components that will be responsible for persisting the changes, by simply creating them via the wizard. While in the wizard, make sure to add the viewobject to the application module as well, as it will be used in the page.

Now select the "CutstomLabelsView" collection from the datacontrol and drop it as a table on the popup.
Creating the Resource Bundle
Create a new class called demoResources that extends ListResourceBundle class.
In this class create a method getContents() to collect data from the database via the binding framework, and add the fetched data to the resource bundle.
1:   public Object[][] getContents() {
2:    DCIteratorBinding labelIter =
3:     getBindings().findIteratorBinding("CutstomLabelsView1Iterator");
4:    RowSetIterator labelRSI = labelIter.getRowSetIterator();
5:    int count = labelRSI.getRowCount();
6:    Object[][] theseContents = new String[count][count];
7:    Row labelRow = labelRSI.first();
8:    boolean firstRow = true;
9:    int i = 0;
10:    do {
11:     if (!firstRow) {
12:      labelRow = labelRSI.next();
13:     } else {
14:      firstRow = false;
15:     }
16:     theseContents[i][0] = labelRow.getAttribute("CompId");
17:     theseContents[i][1] = labelRow.getAttribute("Label");
18:     i++;
19:    } while (labelRSI.hasNext());
20:    return theseContents;
21:   }
Preparing the Page
In the page, we have to make sure that the resource bundle is recognized and used.
This can be achieved by using
1:    <f:view>
2:    <f:loadBundle basename="lucbors.blogspot.demo.view.bundle.demoResources"
3:          var="res"/>
4:      .............
For all labels that need to be dynamic, create a reference to the resource bundle. In this example we will just use a few. These, and all others, all look like the following example.
1:       <af:panelBox text="#{res['BOX1']}" id="pb1"
2:              binding="#{componentEditor.firstPanelBox}">
You can pick as many components as you like, just as long as the resource keys that you reference are also available in the database table. You might want to consider adding functionality to the application to add resource keys to the table.
The Magic Part
In order to refresh the bundle every time changes are committed to the database, we just add an extra method to the demoResources class. This method, called refreshBundle gets the bundleName as argument, and when invoked, it will force the bundle to refresh. This can be done by invoking the clearCache method on this bundle.
1:   public static void refreshBundle(String bundleName) {
2:    try {
3:     ResourceBundle.getBundle(bundleName).clearCache();
4:    } catch (Exception e) {
5:     System.out.println("Failed to refresh bundle " + bundleName +
6:               " due to " + e.getMessage());
7:    }
8:   }
Now we only need to make sure that necessary code is executed when committing changes to the database. First add an action attribute to the commit button. This action has to invoke a method ( saveAndRefresh() ) in the componentEditor bean.
1:          <af:commandButton text="Commit"
2:                   id="cb5" partialSubmit="true"
3:                   action="#{componentEditor.saveAndRefresh}"
4:                   actionListener="#{bindings.Commit.execute}"/>
In the saveAndRefresh method, invoke the refreshBundle() method.
1:    public String saveAndRefresh() {
2:    // Add event code here...
3:    AdfFacesContext.getCurrentInstance().addPartialTarget(this.getFirstPanelBox());
4:    AdfFacesContext.getCurrentInstance().addPartialTarget(this.getSecondPanelBox());
5:    demoResources.refreshBundle("lucbors.blogspot.demo.view.bundle.demoResources");
6:    return null;
7:   }
And now, when running the application, every time changes are made to the custom Labels table, the bundle is refreshed, and the new labels are displayed immediately.

And see how this results in an immediate and persisted change.

Conclusion
The use case in this post is just an example of how to persist resource bundle changes and immediatley see these changes in the application. However, by extending ListResourceBundle class, as I did, you can also add objects to the resource bundle. This could for instance be used to implement some kind of content management functionality that will reflect changes immediately.
The application used in this blog is available here.
Comments
How to adapt the example to work in 10g?
Regards,
Saso
How to adapt the example to work in 10g?
Regards,
Saso
I post the question also in JDev forum: http://forums.oracle.com/forums/thread.jspa?threadID=1556706&tstart=15
Regards, Saso
Your post has helped me in implementing the DB bases localization feature in my application. Great post and thanks for the same.
Thanks a lot for your article.
It served me a lot, but I used it to associate the resource bundle to the Message Validations of a Business Rule.
Check it in my blog:
http://www.notjustjava.com/2012/04/load-messages-of-resource-bundle-from-database-with-adf/
I am in need of a similar solution but as you mentioned in this post, this will work only on he current user session.
What if I wanted to totally re-load the resource bundle? Will this be possible?
Other than the obvious part of restarting the server.
I tried it with this code
ResourceBundle.clearCache(Thread.currentThread().getContextClassLoader());