In my previous post I described how to use node-red to interact with twitter. That post was based on some initial research which was eventually used as a basis for the post that you are reading now. For one of our projects I had to setup an Oracle Chatbot on twitter. Now as you might know, Oracle Digital Assistant supports many channels, such as web, facebook, android and iOS, but twitter is not supported. The way to expose a chatbot to a 'not supported' channel is to use a channel of the webhook type.
In this post I describe how I created a working prototype that exposes an Oracle Digital Assistant to Twitter.
The things you need for this are the following:


Now copy the Secret Key and the webhook URL and put them in our node code, so we can actually use the webhook channel:


In this post I describe how I created a working prototype that exposes an Oracle Digital Assistant to Twitter.
The things you need for this are the following:
- Twitter application which is needed to use the Twitter API's to interact with twitter
- A nodejs application where you code the functionality
- A Digital Assistant instance to hold the Bot
- Installation of ngrok to test from your local machine
Create a twitter application
If you have an approved twitter developer account (To apply for a developer account, go to http://developer.twitter.com ) you should be able to create a new app in the 'my apps page' (https://developer.twitter.com/en/apps). Once created, you are provided with the API keys and access tokens that you need to use in the app that you are building, in this case the a nodejs application that we are going to use to listen for tweets, send tweets to our chatbot and to tweet the replies from our chatbot.

With these keys in place, we are ready to go to the next step.
Create a nodejs application to implement the functionality
As a basis for the implementation I used Marcelo Jabali solution for an SMS chatbot described here: https://marcelojabali.blogspot.com/2017/12/using-sms-channels-with-oracle.html
Based on this code, we need to add just a couple of changes to use twitter instead of SMS.
Lets see the twitter specific code:
First of all we need get the node Twitter package from npm, as this is what will be used to interact with twitter. Navigate to the root folder of your code and install the twitter package:

With that in place we can use that package to read from twitter and post to twitter.
The first step is to make sure that we can call the API's. This is where the previously created API keys and tokens are needed.

Next it is time to write out the javascript code that reads from twitter and sends the tweets I need to the Digital Assistant, so it can come up with a reply.
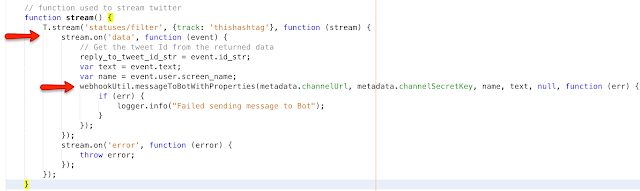
I created a function that reads the twitter stream. Note that I am not using webhooks from twitter, but simply read the twitter stream. I use the tweet ID as identifier (which in fact it is) and make sure that any reply from the bot is sent as a reply to that specific tweet (using 'in_reply_to_status_id').
This actually means that as soon as the node server is started, it starts processing the stream.
In the code below you see that it uses two 'metadata' properties; the channelUrl and the channelSecretKey. Those values are actually provided by Digital Assistant when we configure the webhook channel (see below: "Create a webhook channel for our Digital Assistant")
.

For every tweet that is found (tweets containing keyword 'thishashtag') the messageToBotWithProperties function from the wehookUtil package is invoked. I use this package 'as is' from the previously mentioned SMS sample. The channelURL and the channelSecretKey are values provided by Digital Assistant Cloud when we configure the webhook channel at Digital Assistant Cloud.
Then I created a function that can be called by the Digital Assistants webhook channel to sends its replies. These are then forwarded to a function sendMessage() which actually replies to the tweet with whatever answer that chatbot gave us.

Setup ngrok
You can download and run ngrok on your machine and provide it the port of a network service, usually a web server. All details on how to do the installation and setup can be found here: https://ngrok.com/download
It connects to the ngrok cloud service which accepts traffic on a public address and relays that traffic through to the ngrok process running on your machine and then on to the local address you specified.
Our nodeserver that runs our twitter channel runs on port 3000. Thus when we go to the commandline and enter ngrok 3000, we will be provided with an ngrok URL.
This URL can be used to access the webhook on our local node server from Digital Assistant.
Create a webhook channel for our Digital Assistant
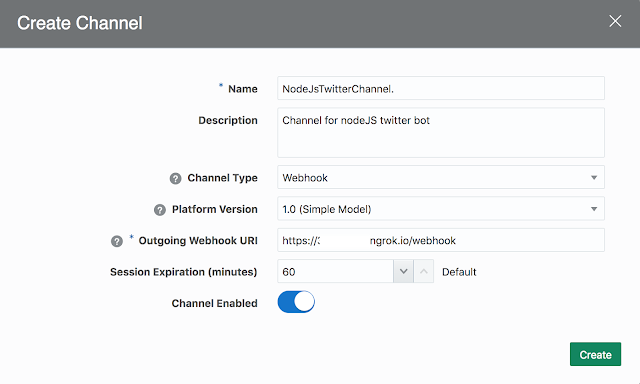
To use the Oracle Digital Assistant with our nodeJS program we need to set up a generic Webhook channel configuration. On our Bot Settings page, navigate to Channels and click the ‘+ Channel’ to start the configuration of the webhook. Provide a name, description, select Webhook as the Channel Type. For platform we will use version 1.0 for now. Finally provide the Outgoing Webhook URI (this is where the Bot will make HTTP requests to our Node.js server) and make sure to enable the Channel. As our node server is running locally, the outgoing webhook URI is pointing to the ngrok URL

After finishing the configuration, click Create. The Webhook URL for our bot is generated and also you get a Secret Key for encrypting messages. These two values will be needed later when we start to configure our node code.

Now copy the Secret Key and the webhook URL and put them in our node code, so we can actually use the webhook channel:

The final result
If you enter a tweet like "I want to order some pizza' containing also our magic word, the pizzabot will be initialised, and ask you your age. From there you can continue the conversation all the way until your pizza is on its way, just as can be seen in the conversation below:

Note about this implementation
This functionality described in this post is a working prototype. However this is not the way we are using this in production. I know I did not disclose all details of the described implementation, nor will I disclose the details of our final implementation, but I will give you some hints. You should be able to figure this out. When streaming the twitter data, you will get all tweets that are posted on twitter, which in our case is much more then we actually need. That is why for production we implemented some extra restrictions on how many tweets we want to search for (using Twitter search instead of Twitter stream), how many tweets are processed (using the count parameter of the twitter search API) and how often the search is executed (using a custom scheduler that calls out to the tweet webhook). One more tweak was that instead of having to use the #thishashtag in all tweets that we want to process, we changed the implementation in such way that we are able to intercept only those tweets that contain a the keywords that where defined specifically for our use-case.Resources
For this implementation I looked at the SMS example by Marcelo Jabali which is posted here: https://marcelojabali.blogspot.com/2017/12/using-sms-channels-with-oracle.html
Also the twitter API documentation was very helpful: https://developer.twitter.com/en/docs/basics/getting-started
And finally the documentation of the node twitter package: https://www.npmjs.com/package/twitter
Comments