At Oracle Code One in October, and also on DOAG in Nurnberg Germany in November I presented on how to go beyond your regular chatbot. This presentation contained a part on exposing your Oracle Digital Assistant over Alexa and also a part on face recognition. I finally found the time to blog about it. In this blogpost I will share details of the Alexa implementation in this solution.
Typically there are 3 area's of interest which I will explain.
Explaining the Webhook Code
The overall setup contains of Alexa, a NodeJS webhook and an Oracle Digital Assistant.

The webhook code will be responsible for receiving and transforming the JSON payload from the Alexa request. The transformed will be sent to a webhook configured on Oracle DA. The DA will send its response back to the webhook, which will transform into a format that can be used by an Alexa device. To code exposes two REST endpoint. One to serve as webhook from Alexa ( /alexa ), and the other one as webhook from the Chatbot ( /webhook ).
The Alexa endpoint will be called from the custom Alexa skill. It will check the kind of request (LaunchRequest, SessionEndedRequest or IntentRequest), and based on that take the appropriate action. So whenever the skill is launched, Alexa will respond with "Hi, what can I do for you?".
If it is an intentRequest, the code will send the command to the Digital Assistant, by invoking "webhookUtil.messageToBotWithProperties".


Note that for this demo I will be running this webhook code on my 'local cloud', so I will have to use ngrok to make the Endpoint available over the internet.
Setup ngrok
You can download and run ngrok on your machine and provide it the port of a network service, usually a web server. All details on how to do the installation and setup can be found here: https://ngrok.com/downloadWhen invoking ngrok it will connect to the ngrok cloud service which accepts traffic on a public address and relays that traffic through to the ngrok process running on your machine and then on to the local address you specified.
The nodeserver that runs our Alexa channel runs on port 3000. Thus when we go to the commandline and enter ngrok 3000, we will be provided with an ngrok URL. This URL can be used to access the webhook on our local node server from Digital Assistant.
Working with Amazon Alexa
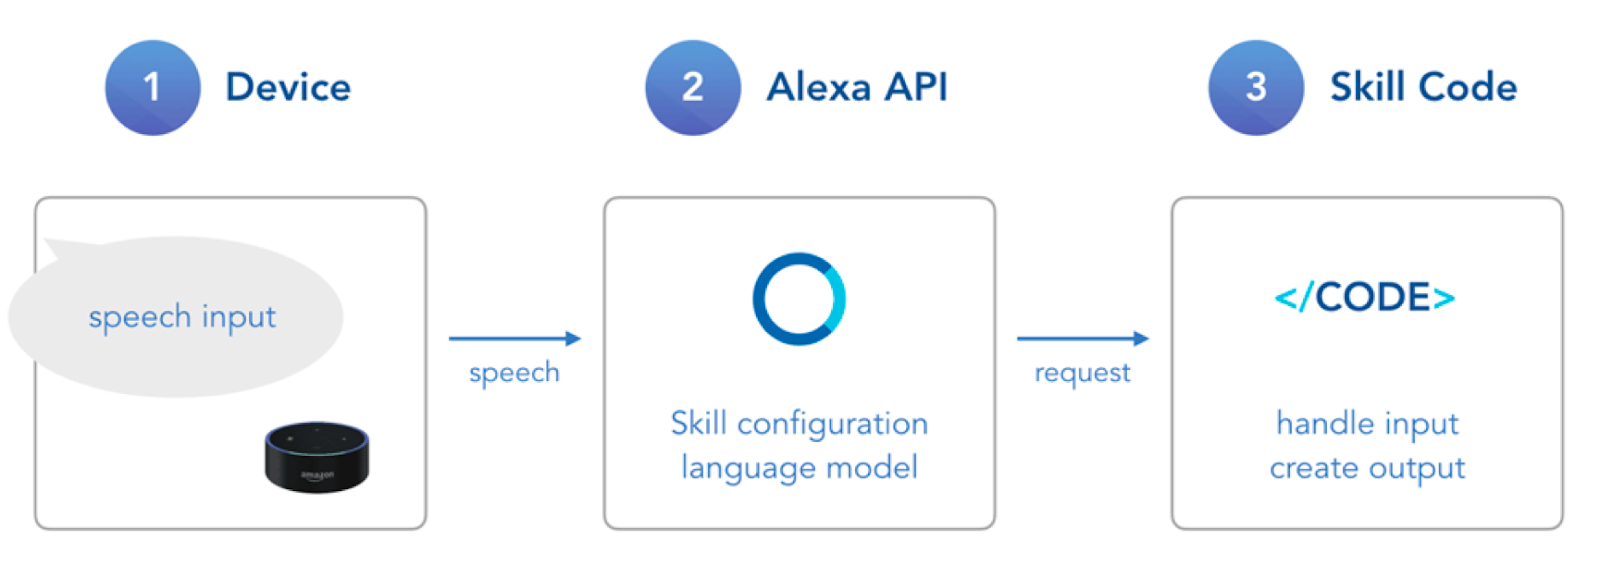
The way to interact with Alexa is by sending a command (either speech or text) to an Alexa Enabled device. This command will be forwarded to a skill running on Amazons' Alexa Service and eventually to services or datasources that can provide the requested information:
 |
| Source:https://bit.ly/2P8yOAT |
There a many skills available with Alexa, and if the one you need is not available, you can also create your own custom skill. That is what we will do to enable our Digital Assistant (DA) to work with Alexa.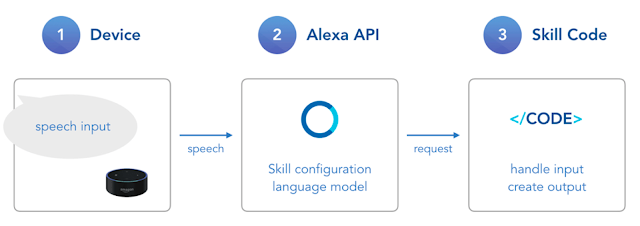
We will create a custom Alexa skill that will invoke a REST endpoint, which will forward the Alexa request to our DA, and will also get the DA's response and send it back to Alexa.
Setting up our Custom Skill on Alexa
To create a custom skill and make it work, we will need to configure the following.
An invocation sentence.
For this purpose, we will use "Demo Oracle Pizza Bot". So whenever the user says "Alexa, Demo Oracle Pizza Bot" this custom skill will be invoked
An intent.
With an intent you try to say what is it that you want, what is your intention. It typically consists of a sentence. Intents can optionally have arguments called slots. Slot values are extracted from utterances and sent with the intent request. We use a slot type "AMAZON.LITERAL" so it can hold whatever text that is sent to it, and that text will be forwarded to the endpoint.

An endpoint.
The actual logic for the Custom Skill will in our case be running on a REST Endpoint implemented in NodeJS. For the purpose of this demo it will be running locally and we have an ngrok URL for it.
In the HTTPS endpoint field we need to fill out the exact URL of this:

With this in place, our Custom Alexa Skill is configured. We now need to find the Skill ID so we can put that in the configuration section of our Node code. The Skill ID can be found from the Alexa Skills Kit (ASK) Developer Console:

Copy the ID and paste it in the configuration section of our Node code:

Opening up Oracle Digital Assistant
To use the Oracle Digital Assistant with Alexa, the DA needs to be exposed through a generic Webhook channel. As mentioned before, I used the pizzaBot sample provided with the Oracle DA. I made a minor change to it, as the ageChecker does not understand what "twenty one" means... it is not a DA issue, but a programming issue in the age checker:

That is why I removed that age check for this demo.
On the pizzaBot Settings page, navigate to Channels and click the ‘+ Channel’ to start the configuration of the webhook. Provide a name, description, select Webhook as the Channel Type. For platform we will use version 1.0 for now. Finally provide the Outgoing Webhook URI (this is where the Bot will make HTTP requests to our Node.js server) and make sure to enable the Channel. As, for this demo, our node server is running locally, the outgoing webhook URI is pointing to the ngrok endpoint:

The WebhookURL and the SecretKey need to be entered in the configuration section of the node code that implements the webhook:
With this all working, we can now test the speech integration. This can be done from the Alexa Skill Tester.

And if all is configured correctly, you should be able to order your pizza by saying "demo oracle pizza bot" and tell that you like to order a pizza.
Testing with the Alexa App on Android
In order to make things simple, I decided to run Alexa on my Android phone. In the Google Play Store search for Alexa and select Amazon Alexa. Tap the Install button and wait while the Amazon Alexa app downloads onto your device. Once you have installed Alexa on your phone, you will need to set it up. Open the Amazon app. and log in using your existing Amazon account information, including your email address (or phone number, if you have a mobile account) and password. Tap the Sign In button.

Once logged in, you should be able to use the app as where it an Amazon Echo or Dot. Here is a recording to prove this.
Running Alexa on a raspberry Pi
As I personally do not have access to an official Alexa device, I decided to try and run Alexa on a raspberryPi. After doing some research I found AlexaPi (https://github.com/alexa-pi/AlexaPi). It is not very difficult to setup AlexaPi and there is an extensive installation manual here: https://github.com/alexa-pi/AlexaPi/wiki/Installation. The idea is the create something like shown below.
Before you start the installation however, you need to make sure to use some specific libraries, as the new versions of these do not work. This specific issue, and the fix for it van be found here: https://github.com/alexa-pi/AlexaPi/issues/420 In general it is about two libraries: CherryPy (version 10.2.1) six (version 1.11.0).
The raspberryPi running AlexaPi needs to be configured as an Alexa Device. This can be done at the Alexa Developer Console. Simply go there and create a new device:
In the first step you enter some generic info like name and ProductID.

In the second step you enter security profile information, and you will be provided with a clientID and clientSecret. You also need to enter all URLs associated with this security profile.

When you run the setup script for AlexaPi, it eventually will ask you to enter a couple of values in order to finalise the configuration. Those values are the ones that you entered while creating the Alexa Device on the Alexa Developer Console. Note that all of these steps are also documented in the already mentioned extensive installation manual :

With all configurations ready, you can now use your RaspberryPi as an Alexa Device. Simply say "Alexa, Demo Oracle Pizza Bot" and the custom skill will be invoked, just like it would from any other Alexa Device.
Notes
This post describes how to expose Oracle DA using voice over Alexa. When this demo was developed in August, it was based on Oracle Digital Assistant version 18.3.5 which does not know the concepts of Skills. Neither did Oracle (at that time) publish any collateral regarding Alexa integration. Meanwhile, there is version 18.4.3 and Oracle did publish a how to on Alexa integration. The details can be found here on the Oracle Mobile & Digital Assistant Blog
I hope this post gives you an idea of how things work and enable you to implement your own speaking Digital Assistant.
Comments