Last week I was asked this question : "Can we print directly from within our ADF Application, without invoking the printer dialog ?" I wasn't sure but after some investigation the answer was clear. Yes you can ! Here is how...
I decided to create a print start up form where I can select printers and print the document. Most of the functionality needed is provided by the Java Print Service API.
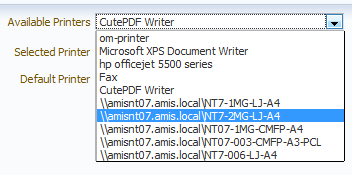
Selecting available printers
I start with a way to show all printers available to the session. For that I simply use the PrinterServiceLookup.
The result I can now use to create an Array of SelectItems in order to make the list available in the application.
On the pagefragment I use a selectOneChoice component getting the values from the list created above. The code for the pagefragment is like this:
When I run the application I see a list of all printers defined om my local machine and I can select any printer I like ...
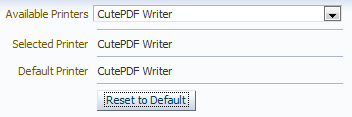
What is the default printer ?
Usually there is a default printer defined. That is the one I want to use by default in this application. For that to work I need to get hold of the default printer defined. This can be found by invoking lookupDefaultPrintService().
If no printer is selected yet in the ADF Application, I use the default printer. I need to make an adjustment to the getter of the selected printer to return the default printer.
Final requirement for the print startup form is to be able to reset the selected printer to the default if another printer was selected previously. For that I use a CommandButton that invokes an actionListener where I simply set the currently selected printer to be the default printer.
By using this button, the default printer will be selected again.
Now what about the actual printing ?
Printing can be done by using the DocPrintJob, FileInputStream and Doc objects.
First is to create a FileInputStream based on the file that I want to print.
Next step is to create a Doc object based on the FileInputStream. Finally create a PrintJob based on the Doc object. I also show the user a message when something goes wrong. All this functionality is implemented in an actionListener behind a command button.
The code for the page fragment is simple.
And the page now has a print button.
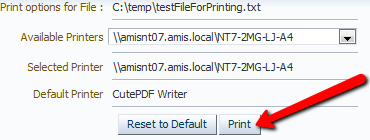
When the print button is pushed, the document is sent directly to the printer.
It is also possible to set job properties such as number of copies, the orientation of the print, and many other properties.
I can check the result of this in the print properties of the printjob.
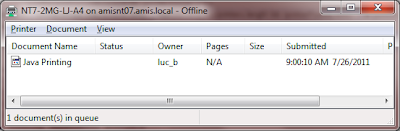
Now one last thing to do is to give the printjob a decent name. As you can see, by default, all jobs have the same name, and that has no relation whatsoever with the document name, neither can it be related to a user or client.
I want to use a jobname that is more descriptive. I can do that by adding the JobName to the PrintRequestAttributeSet.
The result is obvious.
Conclusion
http://www.blogger.com/img/blank.gif
Printing can be done directly from within the ADF Application. You can use almost any of the properties that can be used in the printer dialog of your browser or operating system. This example can be extended and I will probably create an ADF taskflow library to deploy this functionality.
Resources : javax.print javadoc
You can request a copy of the workspace by emailing me at lucbors at gmail dot com. OR you can download the workspace here.
I decided to create a print start up form where I can select printers and print the document. Most of the functionality needed is provided by the Java Print Service API.
Selecting available printers
I start with a way to show all printers available to the session. For that I simply use the PrinterServiceLookup.
 PrintService[] printers =
PrintServiceLookup.lookupPrintServices(null, null);
The result I can now use to create an Array of SelectItems in order to make the list available in the application.
1:   public SelectItem[] getAllPrinters() {
2:    if (allPrinters == null) {
3:     PrintService[] printers =
4:      PrintServiceLookup.lookupPrintServices(null, null);
5:     allPrinters = new SelectItem[printers.length];
6:     for (int i = 0; i < printers.length; i++) {
7:      SelectItem printer =
8:       new SelectItem(printers[i].getName(), printers[i].getName());
9:      allPrinters[i] = printer;
10:     }
11:    }
12:    return allPrinters;
13:   }
On the pagefragment I use a selectOneChoice component getting the values from the list created above. The code for the pagefragment is like this:
1:    <af:selectOneChoice label="Available Printers" partialTriggers="cb1"
2:              value="#{pageFlowScope.applicationPrinterBean.selectedPrinter}"
3:              id="soc1" autoSubmit="true">
4:     <f:selectItems value="#{pageFlowScope.applicationPrinterBean.allPrinters}"
5:             id="si1"/>
6:    </af:selectOneChoice>
When I run the application I see a list of all printers defined om my local machine and I can select any printer I like ...

What is the default printer ?
Usually there is a default printer defined. That is the one I want to use by default in this application. For that to work I need to get hold of the default printer defined. This can be found by invoking lookupDefaultPrintService().
1:   public String getDefaultPrinter() {
2:    PrintService defaultPrinter =
3:     PrintServiceLookup.lookupDefaultPrintService();
4:    return defaultPrinter.getName();
5:   }
If no printer is selected yet in the ADF Application, I use the default printer. I need to make an adjustment to the getter of the selected printer to return the default printer.
1:   public String getSelectedPrinter() {
2:    if (selectedPrinter == null) {
3:     return getDefaultPrinter();
4:    } else {
5:     return selectedPrinter;
6:    }
7:   }
Final requirement for the print startup form is to be able to reset the selected printer to the default if another printer was selected previously. For that I use a CommandButton that invokes an actionListener where I simply set the currently selected printer to be the default printer.
1:   public void resetToDefault(ActionEvent actionEvent) {
2:    // Add event code here...
3:    setSelectedPrinter(getDefaultPrinter());
4:   }
By using this button, the default printer will be selected again.

Now what about the actual printing ?
Printing can be done by using the DocPrintJob, FileInputStream and Doc objects.
First is to create a FileInputStream based on the file that I want to print.
Next step is to create a Doc object based on the FileInputStream. Finally create a PrintJob based on the Doc object. I also show the user a message when something goes wrong. All this functionality is implemented in an actionListener behind a command button.
1:   public void invokePrintJob(ActionEvent actionEvent) {
2:    // Add event code here...
3:    PrintService[] printers =
4:     PrintServiceLookup.lookupPrintServices(null, null);
5:    Boolean printerFound = false;
6:    for (int i = 0; i < printers.length && !printerFound; i++) {
7:     if (printers[i].getName().equalsIgnoreCase(getSelectedPrinter())) {
8:      printerFound=true;
9:      PrintService printer = printers[i];
10:      FileInputStream input;
11:      try {
12:       input =
13:         new FileInputStream(theFile);
14:       Doc doc = new SimpleDoc(input, DocFlavor.INPUT_STREAM.PNG, null);
15:       PrintRequestAttributeSet attrs = new HashPrintRequestAttributeSet();
16:       DocPrintJob job = printer.createPrintJob();
17:       job.print(doc, attrs);
18:      } catch (PrintException e) {
19:       System.out.println(e.getMessage());
20:       addFacesErrorMessage(e.getMessage());
21:      } catch (FileNotFoundException e) {
22:       System.out.println(e.getMessage());
23:       addFacesErrorMessage(e.getMessage());
24:      }
25:     }
26:    }
27:   }
The code for the page fragment is simple.
1:    <af:toolbar>
2:     <af:commandToolbarButton text="Reset to Default"
3:             actionListener="#{pageFlowScope.applicationPrinterBean.resetToDefault}"
4:             partialSubmit="true" id="cb1"/>
5:     <af:commandToolbarButton text="Print" id="ctb1"
6:                  actionListener="#{pageFlowScope.applicationPrinterBean.invokePrintJob}"/>
7:     </af:toolbar>
And the page now has a print button.

When the print button is pushed, the document is sent directly to the printer.

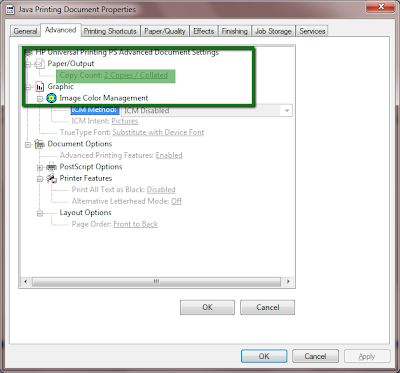
It is also possible to set job properties such as number of copies, the orientation of the print, and many other properties.
1:  attrs.add(new Copies(2));
2:  attrs.add(OrientationRequested.LANDSCAPE);
I can check the result of this in the print properties of the printjob.

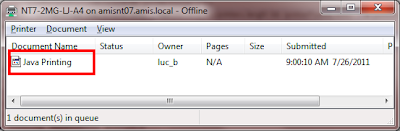
Now one last thing to do is to give the printjob a decent name. As you can see, by default, all jobs have the same name, and that has no relation whatsoever with the document name, neither can it be related to a user or client.

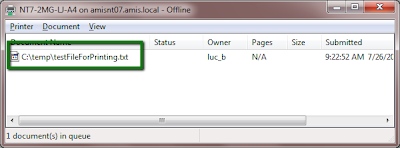
I want to use a jobname that is more descriptive. I can do that by adding the JobName to the PrintRequestAttributeSet.
1:  PrintRequestAttributeSet attrs = new HashPrintRequestAttributeSet();
2:  attrs.add(new Copies(2));
3:  attrs.add(OrientationRequested.LANDSCAPE);
4:  JobName name = new JobName(file ,null);
5:  attrs.add(name);
The result is obvious.

Conclusion
http://www.blogger.com/img/blank.gif
Printing can be done directly from within the ADF Application. You can use almost any of the properties that can be used in the printer dialog of your browser or operating system. This example can be extended and I will probably create an ADF taskflow library to deploy this functionality.
Resources : javax.print javadoc
You can request a copy of the workspace by emailing me at lucbors at gmail dot com. OR you can download the workspace here.
Comments
adelaide printer
Hi Sir,
I am a beginner in ADF and have been trying your excellent post on ADF: Print Directly from your Application.
Can you please send me the workspace please ?
Rakesh
From Mauritius Island.
Hello Luc,
I have a requirement to print about 1000 documents (letters)
to a local pinter with information produced from a template (html)
with custom tagsassociated to information from de Oracle DB.
I think part of your example will help us to handle the selection of the printer.
Could you share your workspace ?
Any hint about working around this requirement would be appreciated.
I have made some tests and to avoid printing the header/footer of the browser
used the pdf format, but it is a slow process.
Thanks in advance,
Wilhelm
Hello, I was reading your blog entry http://lucbors.blogspot.com/2011/07/adf-11g-printing-directly-from-your.html
and I would like to request the workspace you used for the sample, right know I'm working on something related with direct printing and your post really helps me.
Receive my regards.
Hello, I was reading your blog entry http://lucbors.blogspot.com/2011/07/adf-11g-printing-directly-from-your.html
and I would like to request the workspace you used for the sample, right know I'm working on something related with direct printing and your post really helps me.
Receive my regards.
julykt@gmai.com
Regards
KT
It returns a null value.
Any idea how can I solve this problem?
Thanks for the post.I used this application and tried to print, but its not working
neither am i getting any error.
I am using jdev 11.1.2.0.0
Please help me.
Thanks,
Vishnu
I tried running you application, but I couldn't print the document.
Is there any extra configuration I need to do for printing to work from Application ?
Regards,
Gaurav Kishan
I tried running you application, but I couldn't print the document.
Is there any extra configuration I need to do for printing to work from Application ?
Regards,
Gaurav Kishan
I tried running you application, but I couldn't print the document.
Is there any extra configuration I need to do for printing to work from Application ?
Regards,
Gaurav Kishan