Recently I had to setup an application that was able to read twitter and, based on some predefined keywords, had to reply to specific tweets. I decided to have a look at node-red to set this stuff up. It proofed to be rather straightforward and easy to implement. The hardest part was to get approval for a twitter developer account. In this post I describe how I used node-red and how I implemented the interaction with twitter.
 When you now browse to http://127.0.0.1:1880 you will see the Node-RED flow editor.
 I will not explain how to use the node-RED flow editor, as there is a whole lot of documentation. These docs (https://nodered.org/docs/) are very helpful, and for the twitter example there is not much need to read the entire node-RED documentation.
To apply for a developer account, go to http://developer.twitter.com and sign in with your twitter account. Next, click apply in the upper right corner and follow the instructions. Getting you developer account approved could take some time. I had to wait for about 4 weeks, but eventually I got approved.
Next you are able to create a new app in the my apps page (https://developer.twitter.com/en/apps). Once created, you are provided with the API keys and access tokens that you need to use in the app that you are building, in this case the node-RED twitter flow,


 With the twitterIn component configured, we are now ready to create a function node that can work with the tweet and reply with an answer. All information that flows between the steps in a node-red flow is based on "msg". This means that the tweet that was intercepted by the tweetIn components is forwarded to the function component as "msg".
From that "msg" we can now retrieve all necessary information, such as the tweet text ("msg.tweet"), the name of the twitter user ("msg.user.screen_name") and the id of the tweet ("msg.tweet.id_str"), which we will need to send back an inline reply to that message. The code below shows you how we can use all of the above information to construct a new "msg" that contains the tweet that we will send out.
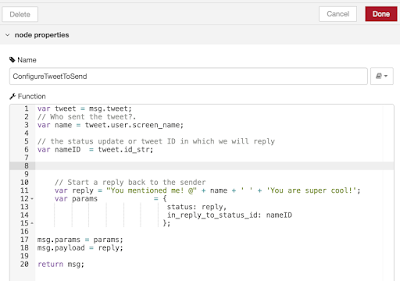
Note that when we don't use the in_reply_to_status_id, the tweet will be posted as an individual tweet without any relation to the tweet that invoked the 'conversation'.
You might want to add some debug steps (the green ones below) that help you to understand what is happening. The complete flow will look similar to the image below:

What is node-red, and how to use it?
Node-RED (https://nodered.org/) is a programming tool for wiring together hardware devices, APIs and online services in new and interesting ways. It provides a browser-based editor that makes it easy to wire together flows using the wide range of nodes in the palette that can be deployed to its runtime in a single-click. You can use node-RED in many ways, but for the purpose of this demo I decided to run it in a docker image. I used the way described here (https://hub.docker.com/r/nodered/node-red-docker/), as this is a node-RED provided docker image. Assuming you have docker up and running, it is simple to install and run node-RED.docker run -it -p 1880:1880 --name mynodered nodered/node-red-docker

Getting permission to use twitter API's
As of late July, twitter implemented a new policy (https://blog.twitter.com/developer/en_us/topics/tools/2018/new-developer-requirements-to-protect-our-platform.html) that will protect the twitter platform from mis-use and spam. That new policy also means that I was not able to create an app that can listen for tweets and reply to them without applying for a twitter developer account. All developers must apply for a developer account to access Twitter APIs. Once approved, you can begin to use the standard APIs and the new premium APIs.To apply for a developer account, go to http://developer.twitter.com and sign in with your twitter account. Next, click apply in the upper right corner and follow the instructions. Getting you developer account approved could take some time. I had to wait for about 4 weeks, but eventually I got approved.
Next you are able to create a new app in the my apps page (https://developer.twitter.com/en/apps). Once created, you are provided with the API keys and access tokens that you need to use in the app that you are building, in this case the node-RED twitter flow,

Building the twitter interaction flow.
What we will use to make this work are 2 'twitter' components. One for twitterIn and one for twitterOut. These two components will be connected by a function component that we will use to construct an outgoing tweet. The twitterIn component has to be hooked up to your twitter account. You can also add a comma separated list of words and/or hashtags you want to listen for:
You also need to enter the API keys and Access tokens that were created in the previous step.

From that "msg" we can now retrieve all necessary information, such as the tweet text ("msg.tweet"), the name of the twitter user ("msg.user.screen_name") and the id of the tweet ("msg.tweet.id_str"), which we will need to send back an inline reply to that message. The code below shows you how we can use all of the above information to construct a new "msg" that contains the tweet that we will send out.
Note that when we don't use the in_reply_to_status_id, the tweet will be posted as an individual tweet without any relation to the tweet that invoked the 'conversation'.
You might want to add some debug steps (the green ones below) that help you to understand what is happening. The complete flow will look similar to the image below:

The final step here is to "deploy" your node-red flow. This can be simply done by clicking the "deploy" button in the upper right corner of the node-red IDE.
The result.
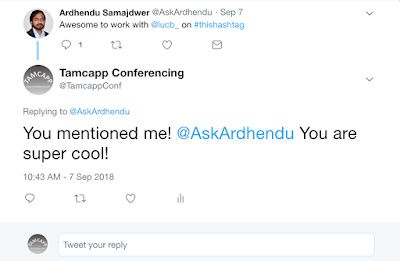
When you now send out a tweet that contains your hashtag, our node-red sample will reply to that tweet with the words "You mentioned me! @" + name + ' ' + 'You are super cool!", as can be seen in the thread below where me and my collegae Ardhendu were testing this interaction.
Comments